
Steps to submit your employer return
You can submit your quarterly return to QLeave in two ways. They are:
- by entering data directly into the online portal, OR
- bulk importing a spreadsheet into the portal
This guide shows you how to submit your return by entering data directly into the online portal. If you'd like to complete your return via spreadsheet, please use the guide available here.
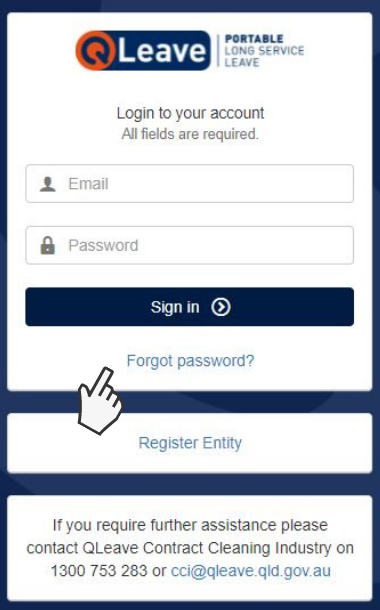
Log in
1. Click here and find the Contract Cleaning Industry Employer Portal.
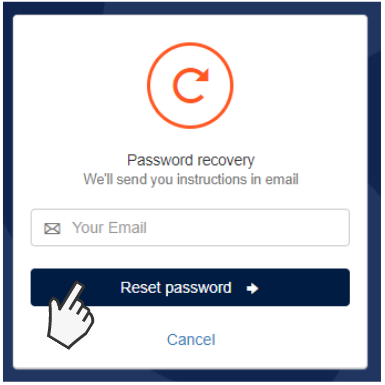
2. If you're logging in to the portal for the first time, you will need to reset your password.
Select Forgot password? and then click the Reset password button on the next screen to receive an email with a password update link. Follow the prompts in the email to reset your password.
Please note: if you're the primary contact for the business, you will receive an email from us when returns become available. If you'd like another contact within your business to have access to the portal so they can complete returns, you will need to enable their portal access. Click here for instructions.
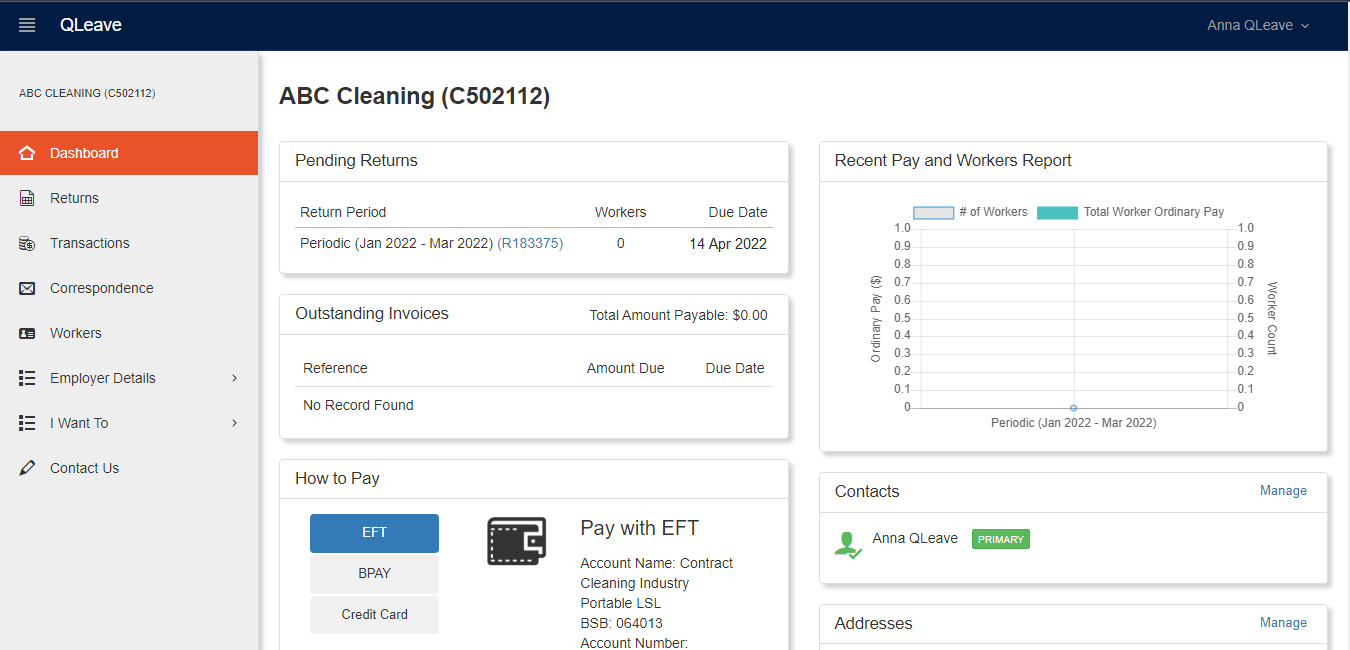
3. Once you’ve logged in to the portal with your new password, you will see your Dashboard on the screen. The dashboard gives you a snapshot of your registration information and tasks including pending returns, outstanding invoices, reports and contact details.
Start your return and add or terminate workers
Start your return
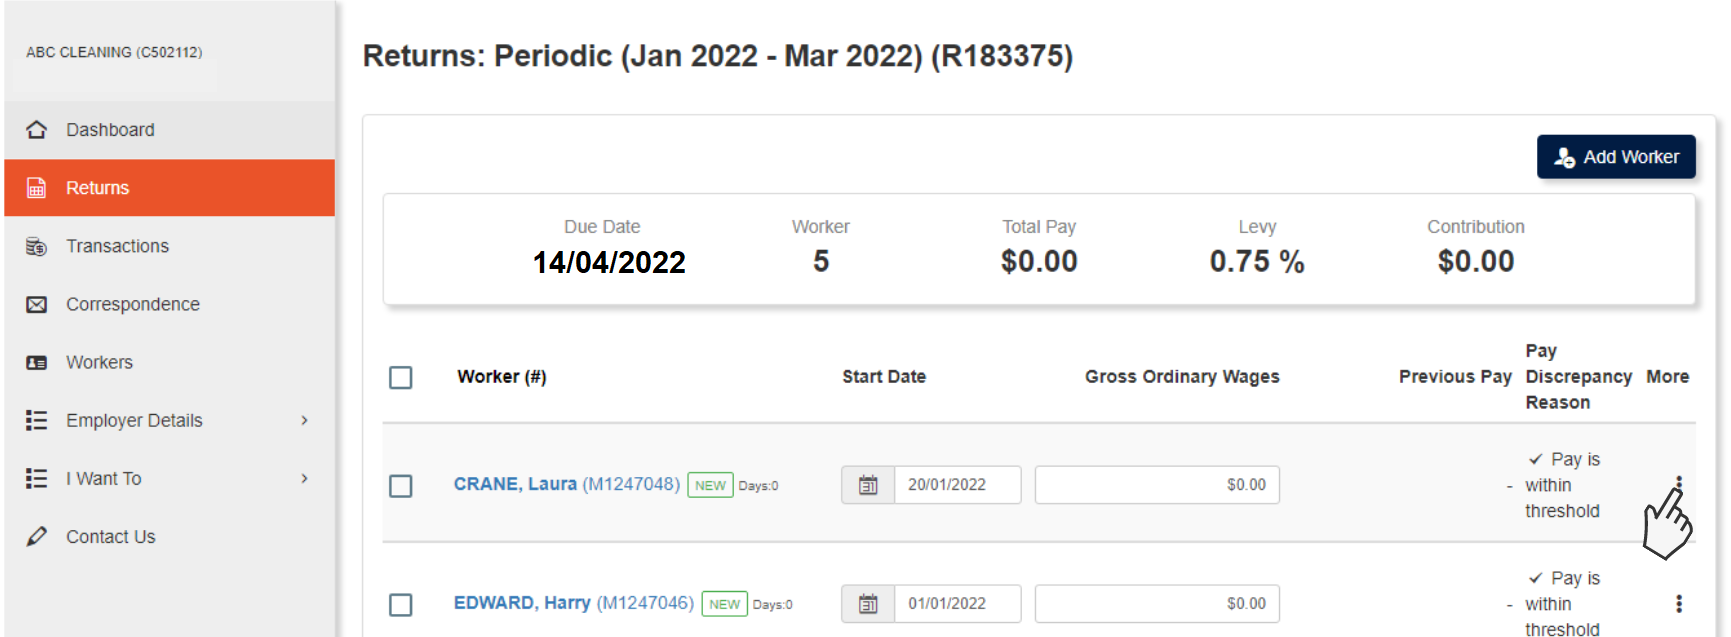
1. Click the Returns tab on the left hand menu.
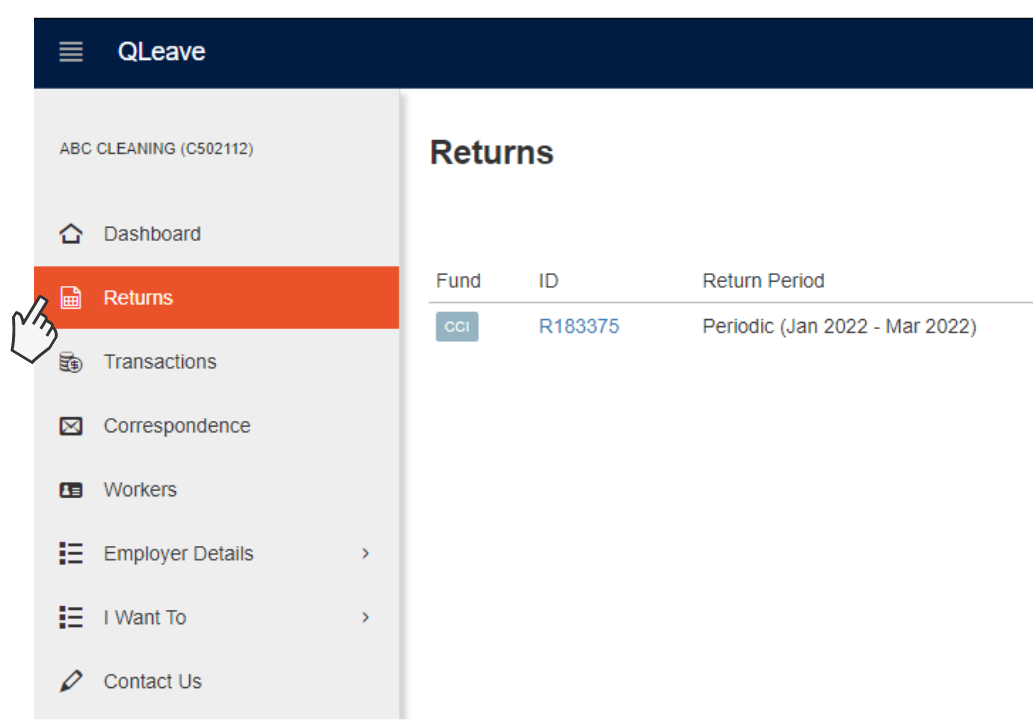
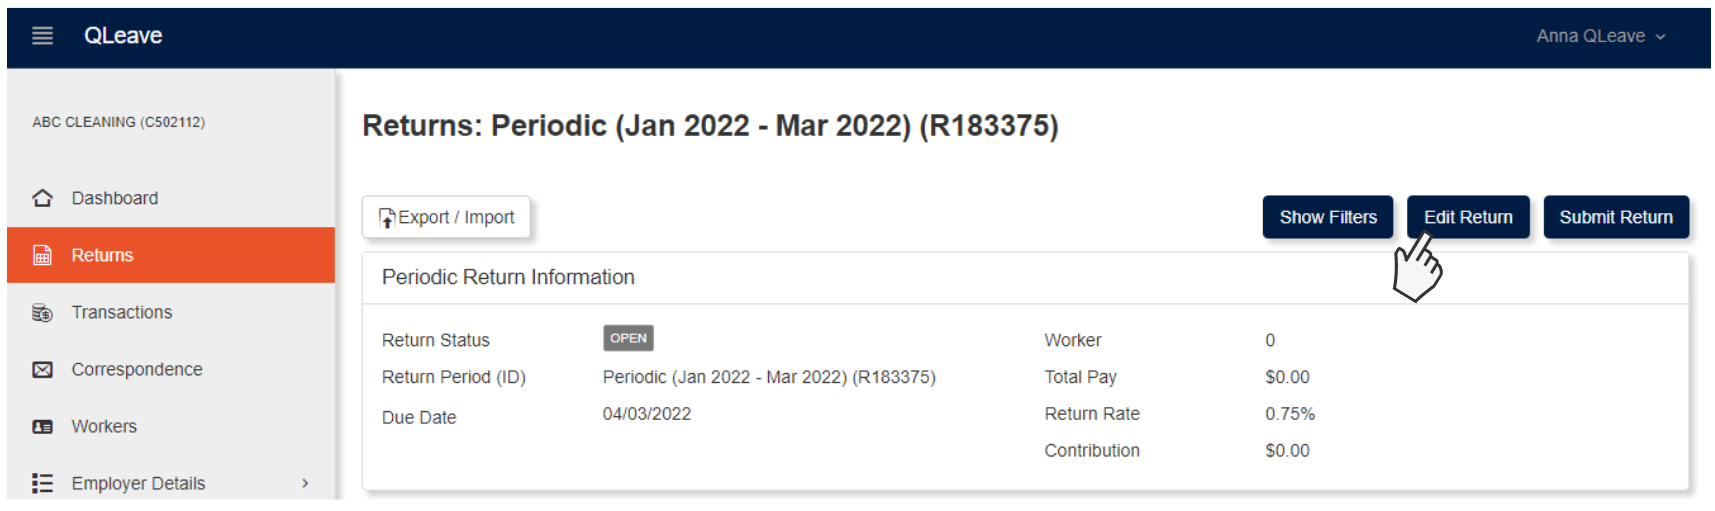
2. Click the blue Return number (e.g. R188375). New returns will have a return status of Open.
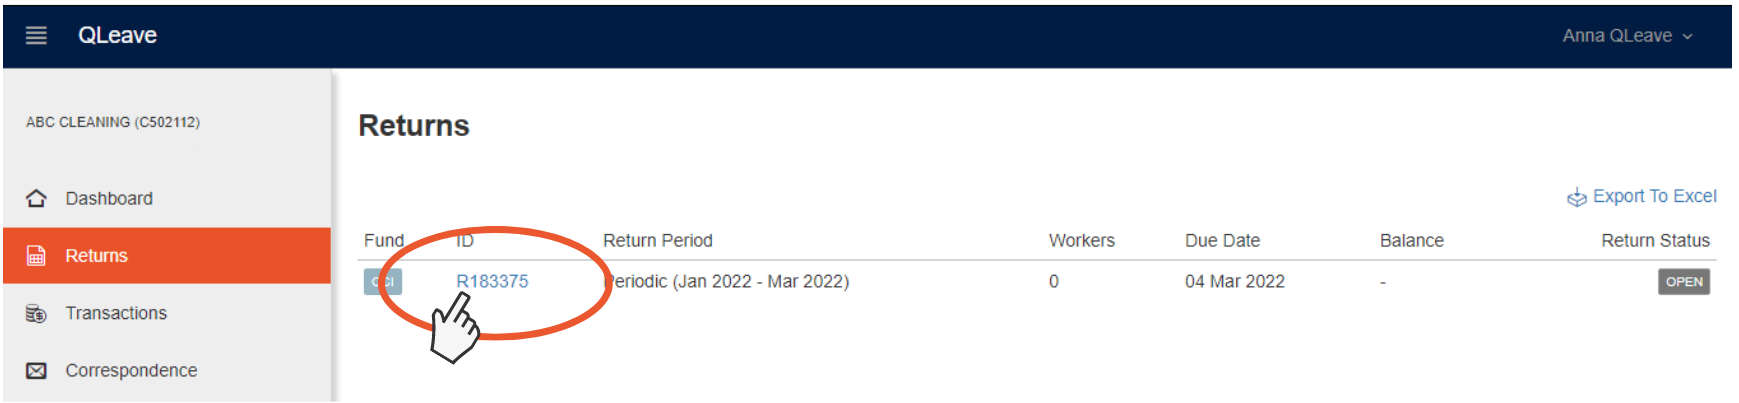
3. Click Edit Return on the top right of your screen to start your return.
Note: if you have multiple open returns, you need to complete the oldest one first. If you try to edit the current quarter's return while having outstanding returns from previous quarters, you'll receive an alert advising that ‘you cannot edit this return as there is a prior return which must be committed before you edit this return’.
This means you can't continue with editing and completing your current return until you've submitted the previous one. Do this first, and then you can start the current return.
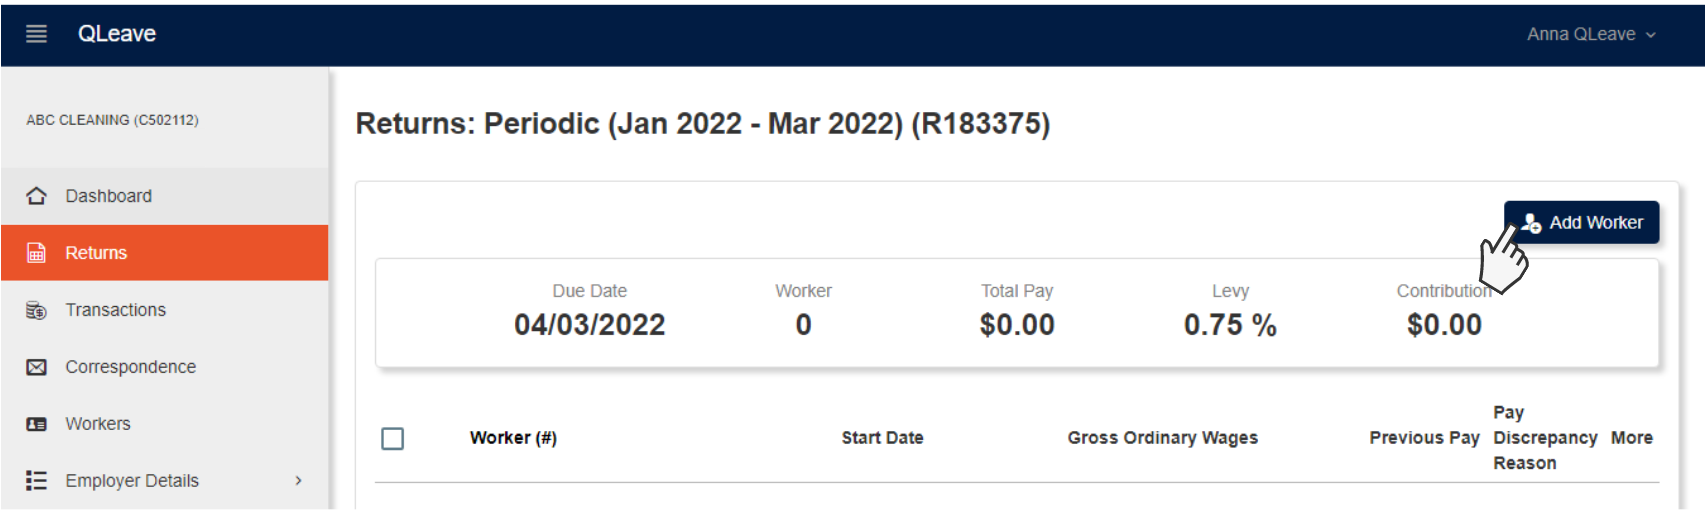
Add Workers
If this is your first return, or you've had new workers start with you this quarter, you will need to add workers to the return before entering data.
Please note, you only need to record service for workers who worked five or more days in the quarter. Any workers who worked less than five days do not need to be included on your return.
1. Click Add Worker
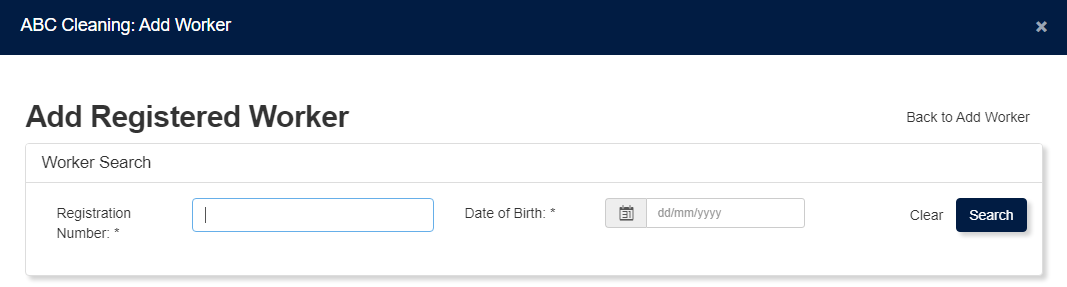
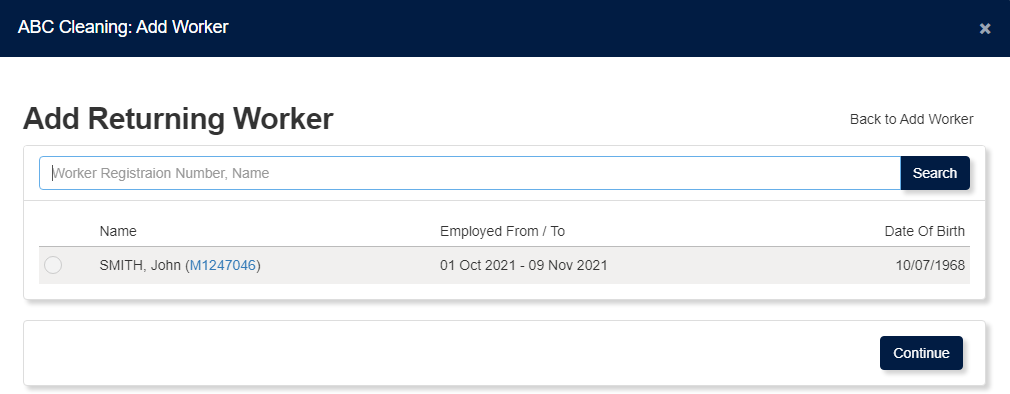
2. Select the option that meets your requirements: Registered Worker, Returning Worker or New Worker and click continue.
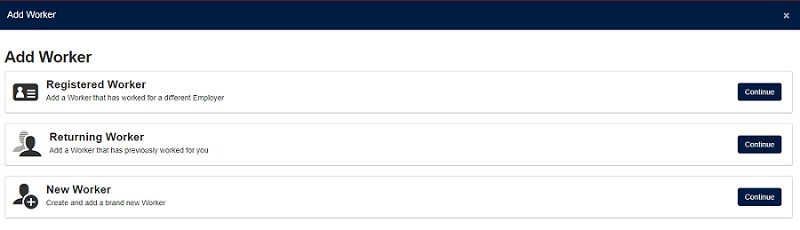
- Add Registered Worker - use this option to add a worker who is already registered with QLeave. You will need their QLeave worker number and their personal details.
- Add Returning Worker - use this option to add a returning worker that you previously employed. Select the returning worker from the list of your previous workers, or you can search for them by their worker number or name.
- Add New Worker - use this option to add a brand new worker, who doesn't have an existing QLeave registration.

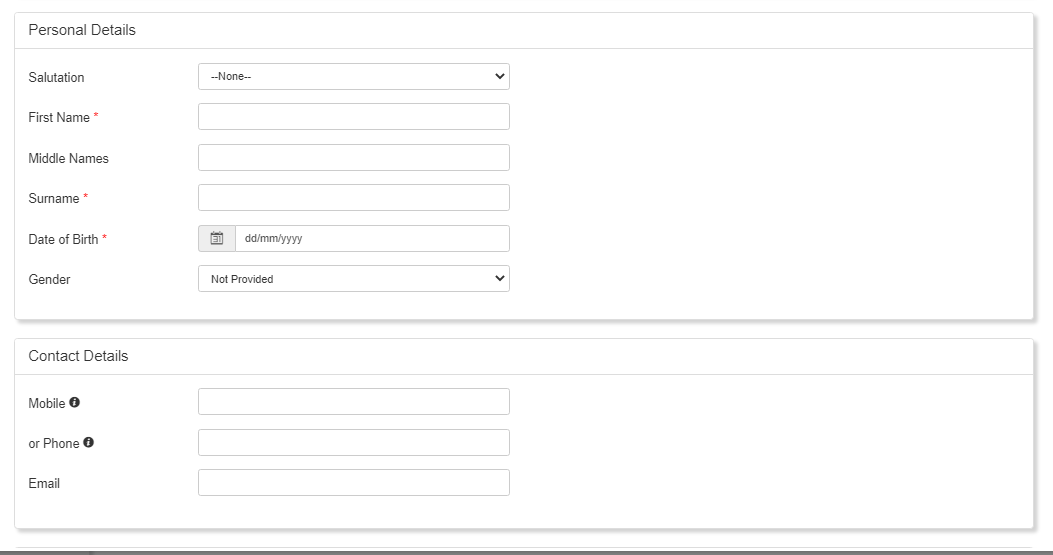
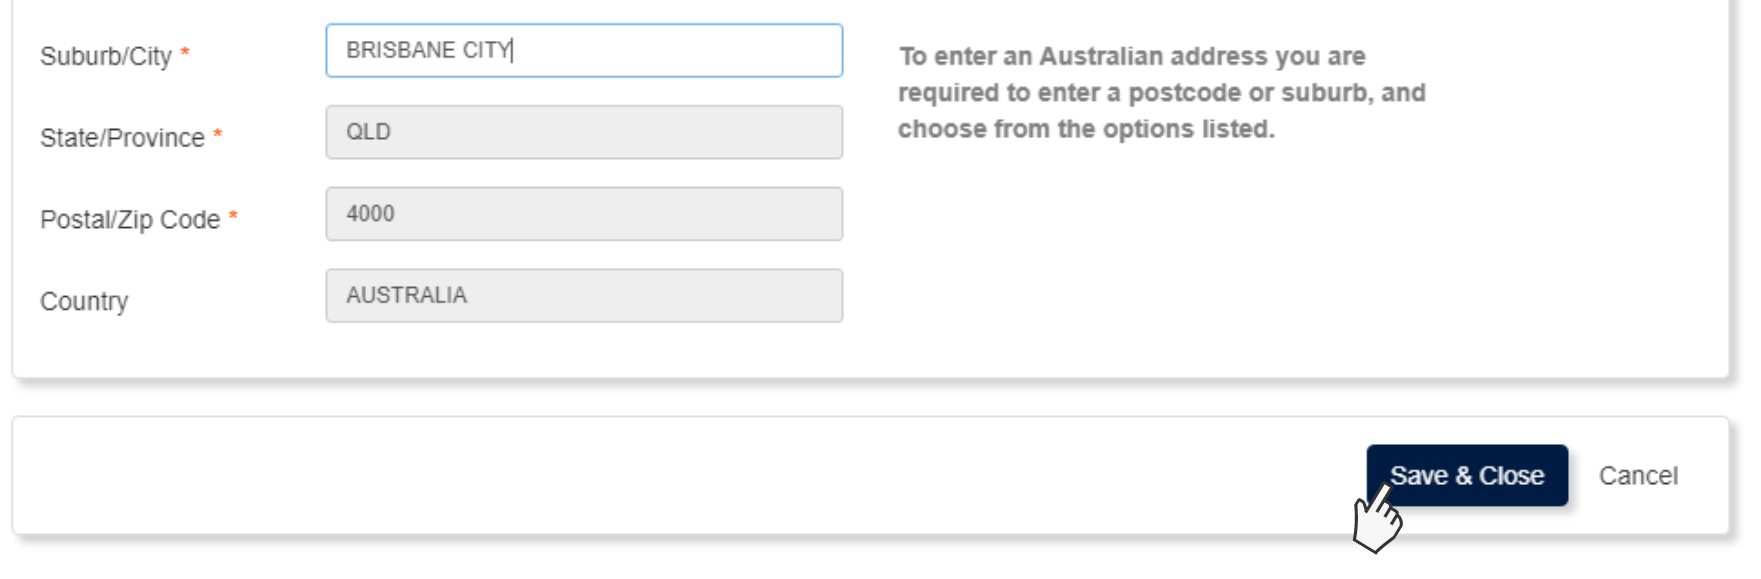
3. Enter the worker's personal details and contact details.
If you're adding a worker with an existing QLeave registration (a registered worker or a returning worker), their name and date of birth will be pre-populated. If you're adding a brand new worker, you will need to enter these personal details.
For all workers, you will need to provide up-to-date contact details including their mobile number, email and postal address. It's important that you provide accurate contact details for each of your workers because this helps us to keep them updated and informed about their portable long service leave.
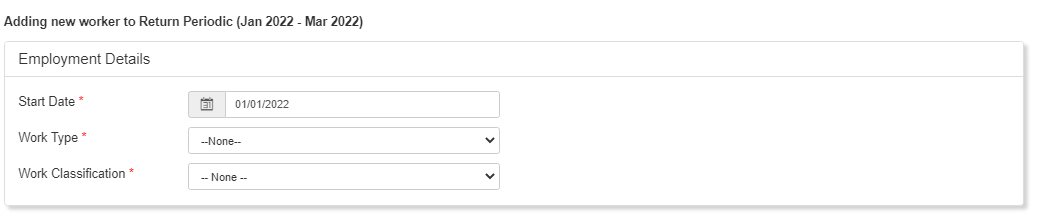
4. You will also need to complete the following Employment Details for each new worker you add.
- Start date - this is the day the worker started working with you. This date must fall within the current quarter. The worker's start date is not the date of lodging the return, the start date of your business, or the current date.
- Work type - you need to select the appropriate option from:
- Employee (PAYG)
- Contractor - Sole Trader (Not engaging workers)
- Contractor - Sole Trader (Engaging workers)
- Director of a Company
- Partner in a Partnership
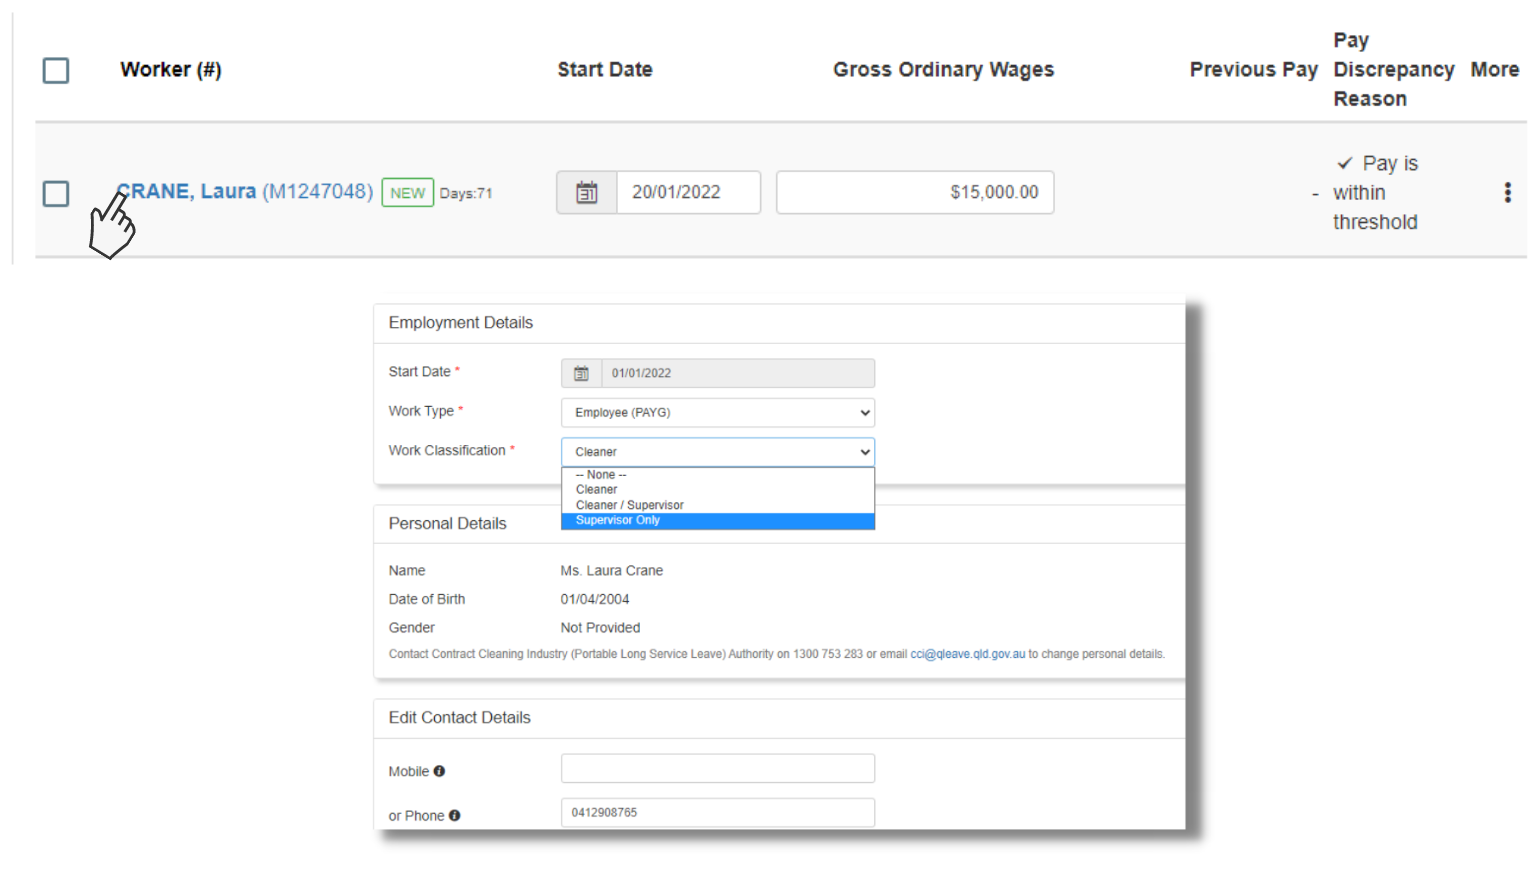
- Trustee of a Trust - Work classification - this refers to the daily duties of the worker. You need to select from:
- Cleaner
- Cleaner/Supervisor (the worker must spend at least 50% of their time performing cleaning work)
- Supervisor only
5. Once you've added employment, personal and contact details for the worker, click Save & Close. This worker will now be added to your return.
Terminate Workers
1. If a worker has stopped working for you or has moved to an ineligible role during the quarter, you will need to terminate them on the return. To do this, click Edit Return and then click on the three vertical dots in the last column of the worker you wish to terminate.
2. Click Terminate
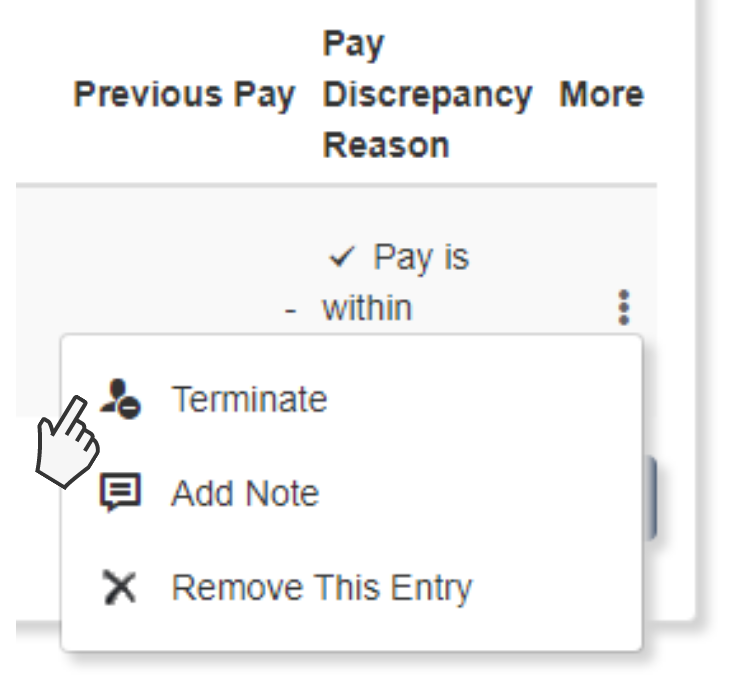
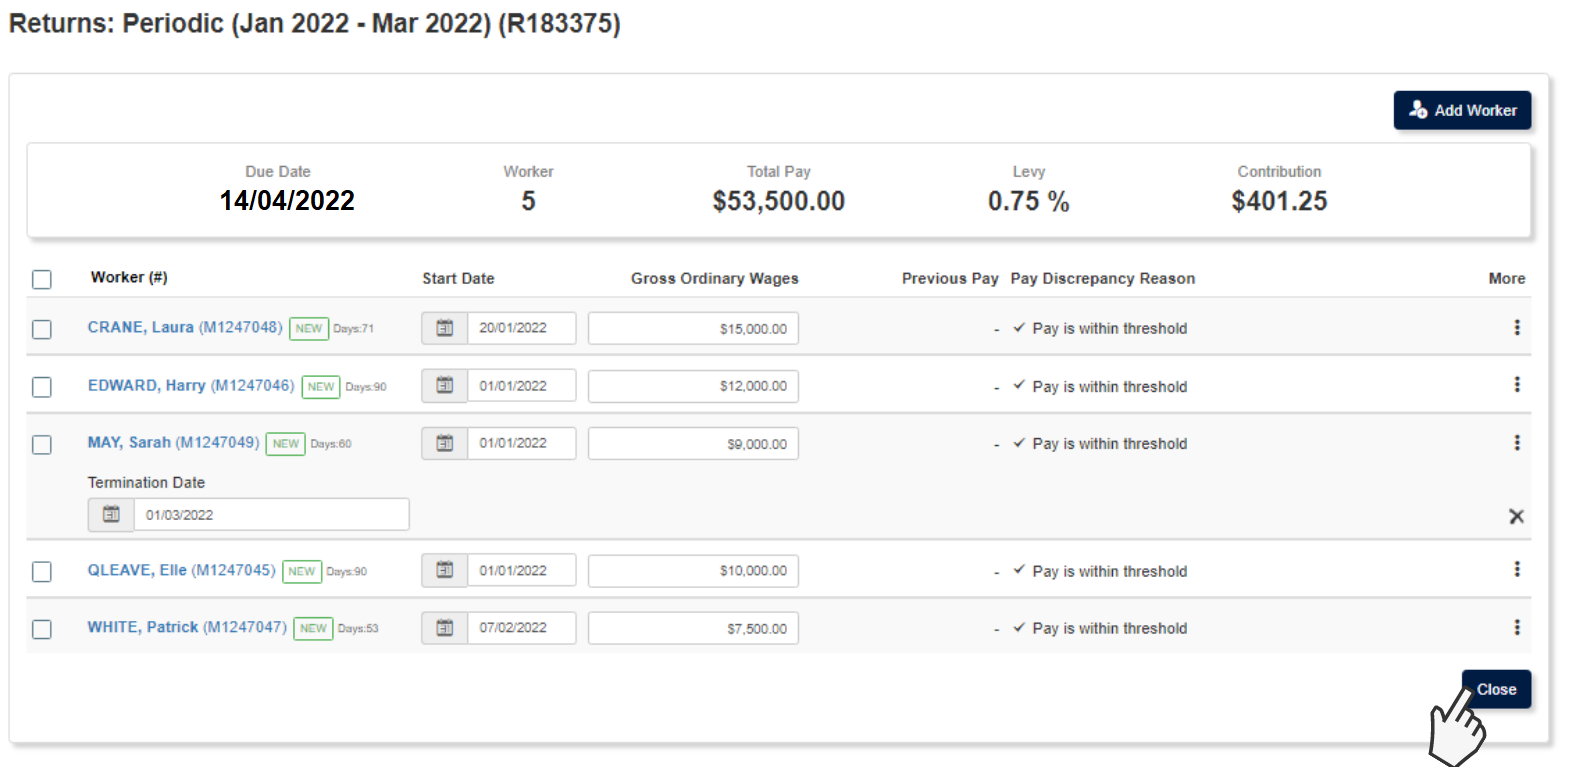
3. Enter a Termination Date
Enter date worker was terminated (or the date they finished performing eligible work). The date entered must be within the return period.

Note: you still need to add gross ordinary wages for terminated workers, up until their termination date, when you complete your return.
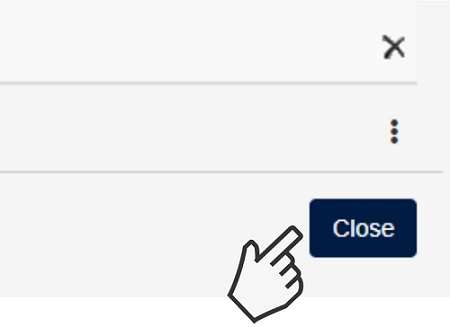
4. Click Close
Complete and submit your return
Completing your return details
1. After adding new workers, you're ready to start adding data to the return. Make your way through the list of workers and enter the Gross Ordinary Wages for each worker during the current return period.
Click here for information on ordinary wages, so you know what to include (and exclude).
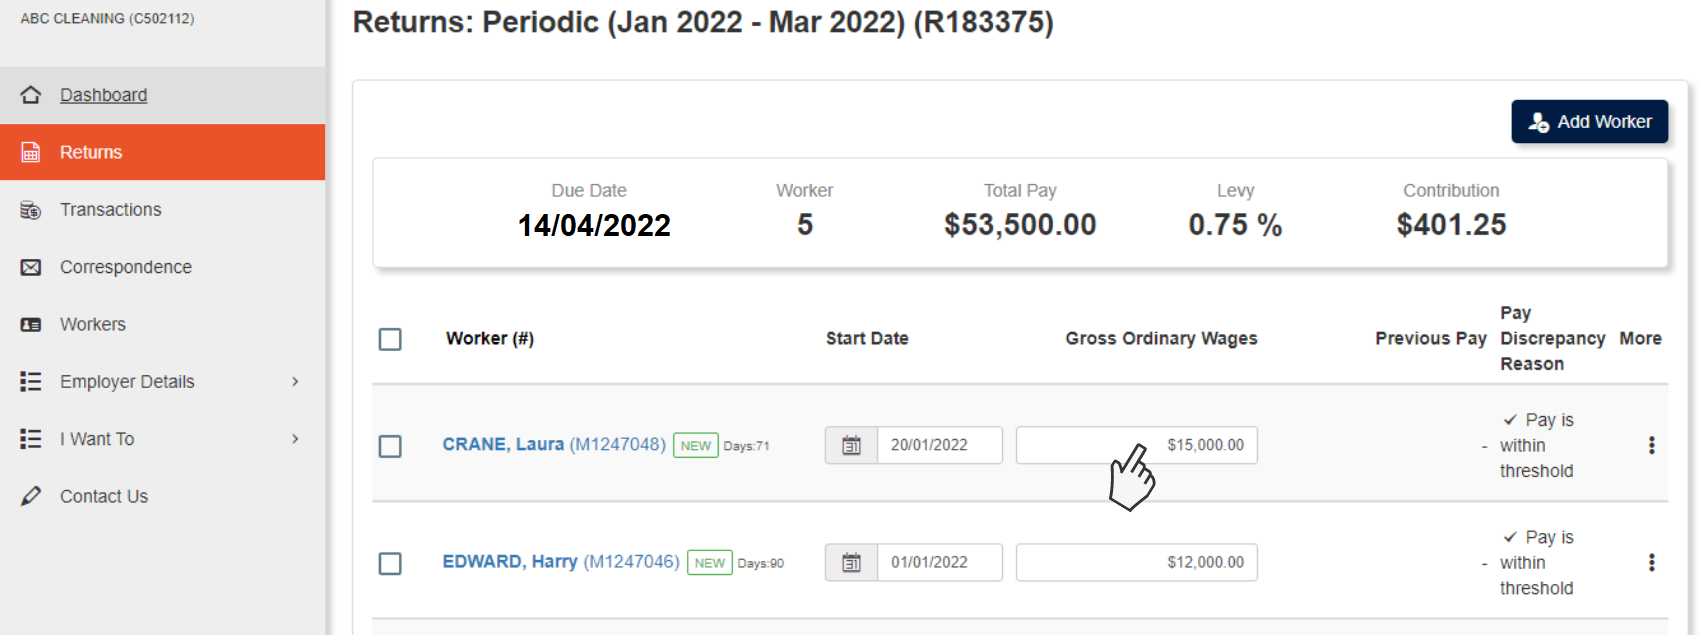
Note: a warning message may appear if the system detects that the ordinary wages for a worker in your current return is greater than their ordinary wages declared in the previous return period. This is designed to alert you to potential incorrect data entry.
If the variation is correct, you will need to add a Pay Discrepancy Reason from the dropdown list. The available discrepancy reasons are: wage increase, employment type change, termination payout, leave without pay or other reason.
2. For existing workers on your return, you need to confirm that their work classification and work type hasn't changed this quarter.
To do this, click on the worker's name. This will open a new screen where you can edit the worker's employment details. For example, if one of your workers has taken on new duties this quarter you may need to change their classification from 'cleaner' to 'supervisor'.
Make any changes you need to and then scroll to the bottom of the page and click Save & Close.
2. Once you've entered the ordinary wages and confirmed the work details of each of your workers, click close to save changes. You can also do this if you need to leave the return at any time. This will save your changes so that you can then come back to finish your return later.
Submitting your return
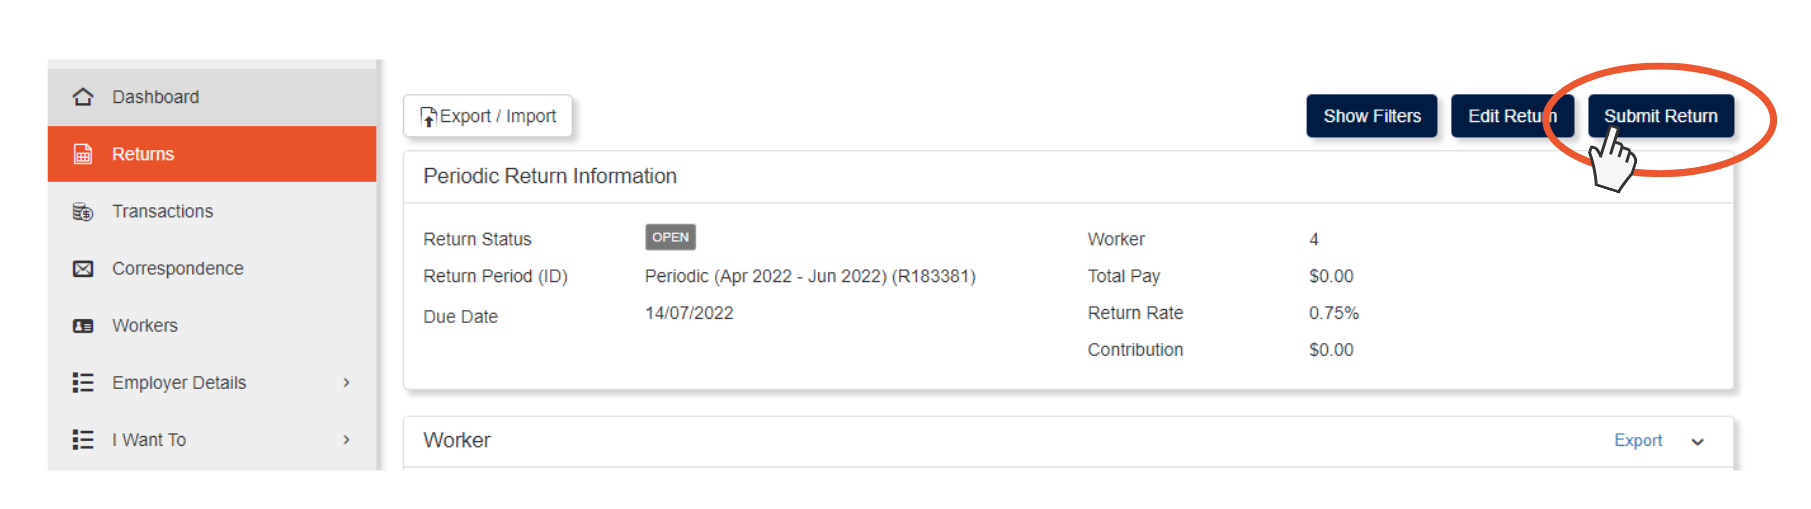
1. Click Edit Return or Submit Return at the top right of your screen.
- If you need to make any changes to your return, click the Edit Return button.
- If you're ready to submit your return, click the Submit Return button to send your completed return to QLeave for processing.
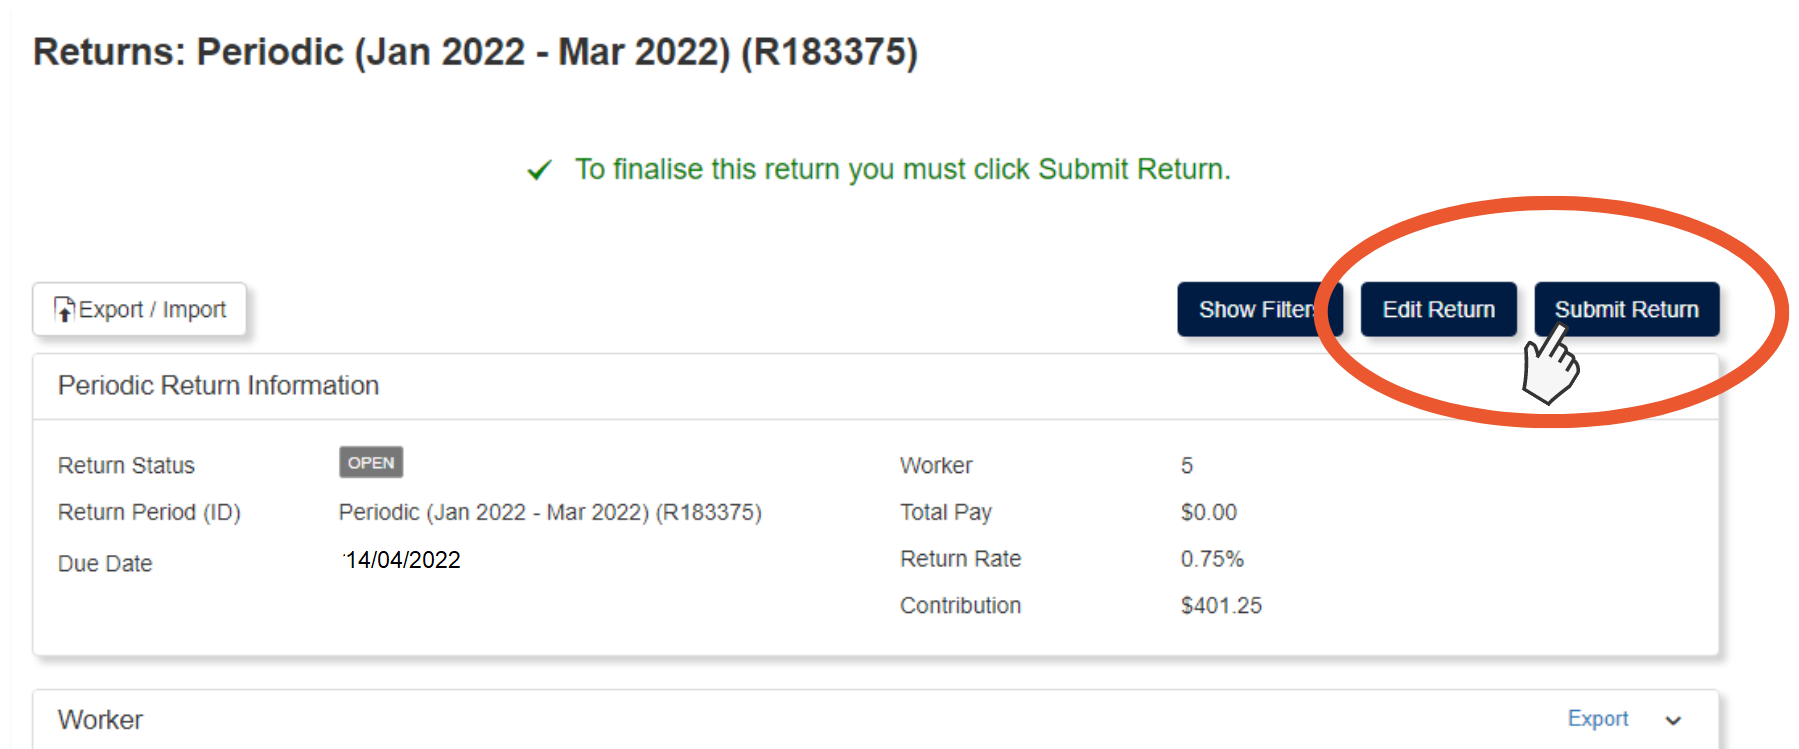
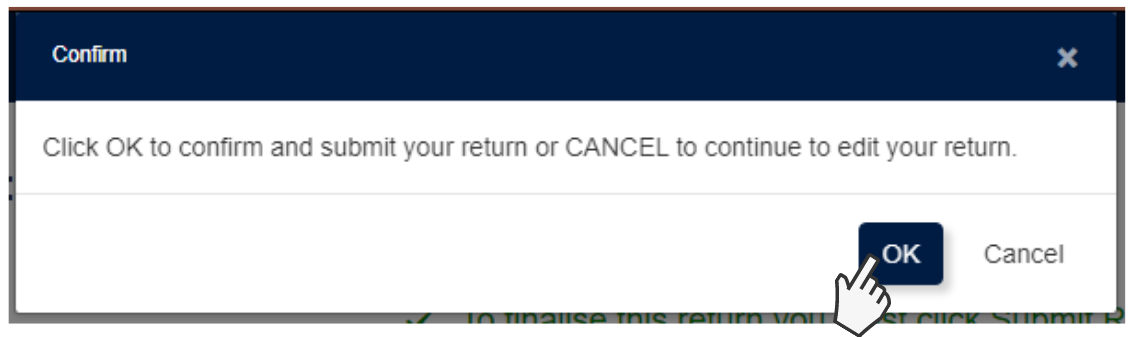
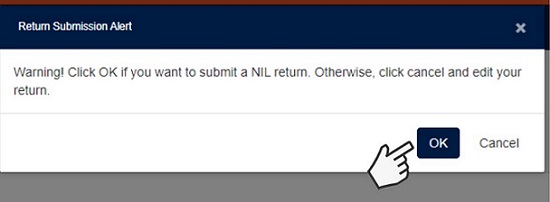
2. When you click Submit Return, a Return Submission Alert will pop up on your screen.
Click OK to confirm and send your return to QLeave. If you need to go back to edit your return, click cancel.
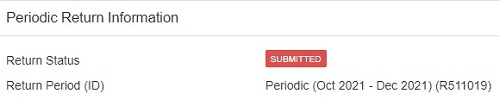
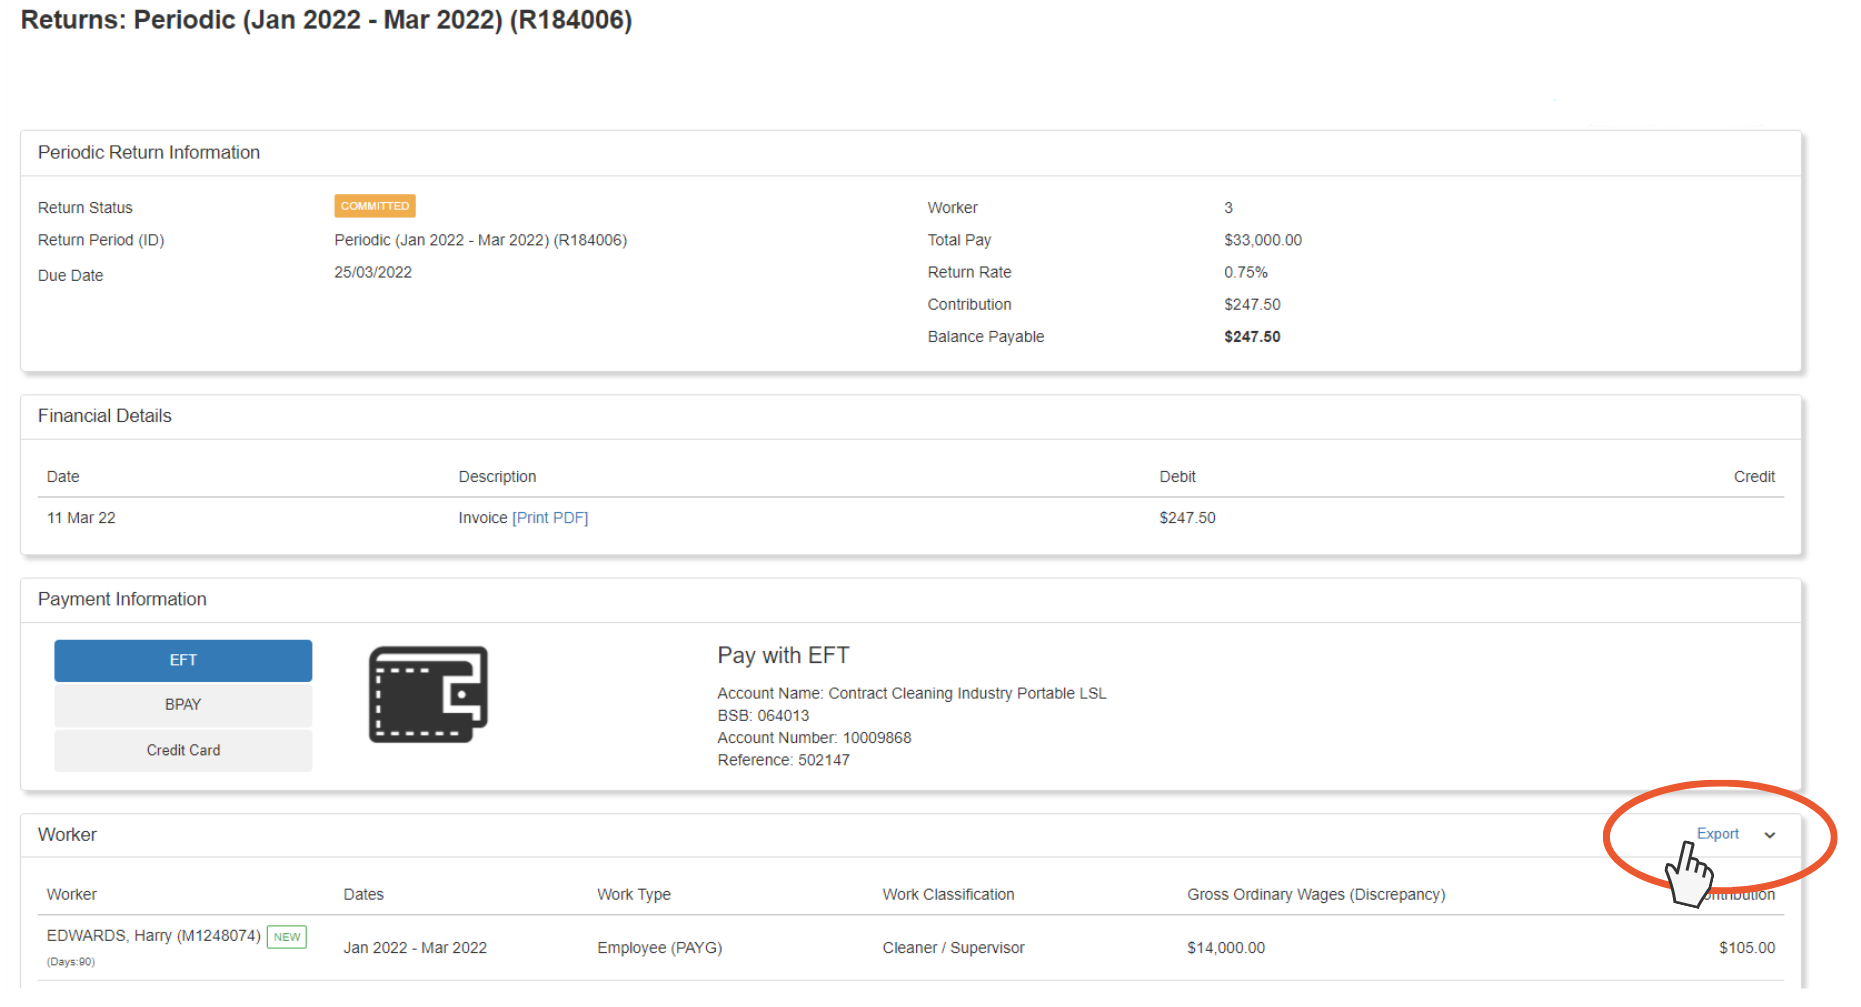
3. Return Status: once your return has been committed the return status will change colour.
- Orange means that your return is committed and ready for payment.
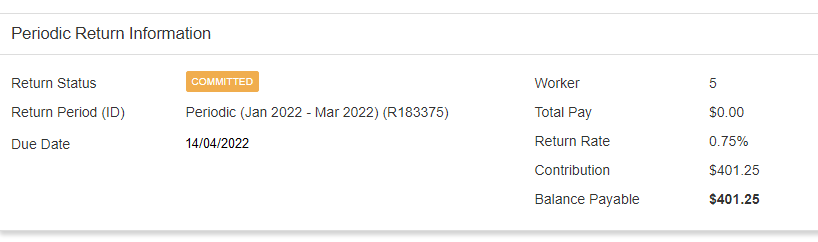
- Red means that your return is submitted and needs to be reviewed by QLeave. We may contact you if we need your help to resolve any issues on your return. Once these issues are fixed, the colour of the return status will change to orange to indicate it's now ready for payment.
Pay the levy
1. Once your return is in the orange committed status, we'll send you an email with your invoice for the levy payment. This will be sent to the primary contact for your business.
You can also download your invoice from the dashboard, or by selecting either Returns or Transactions from the left hand menu. Once you've found your invoice, click [Print PDF] to download it.
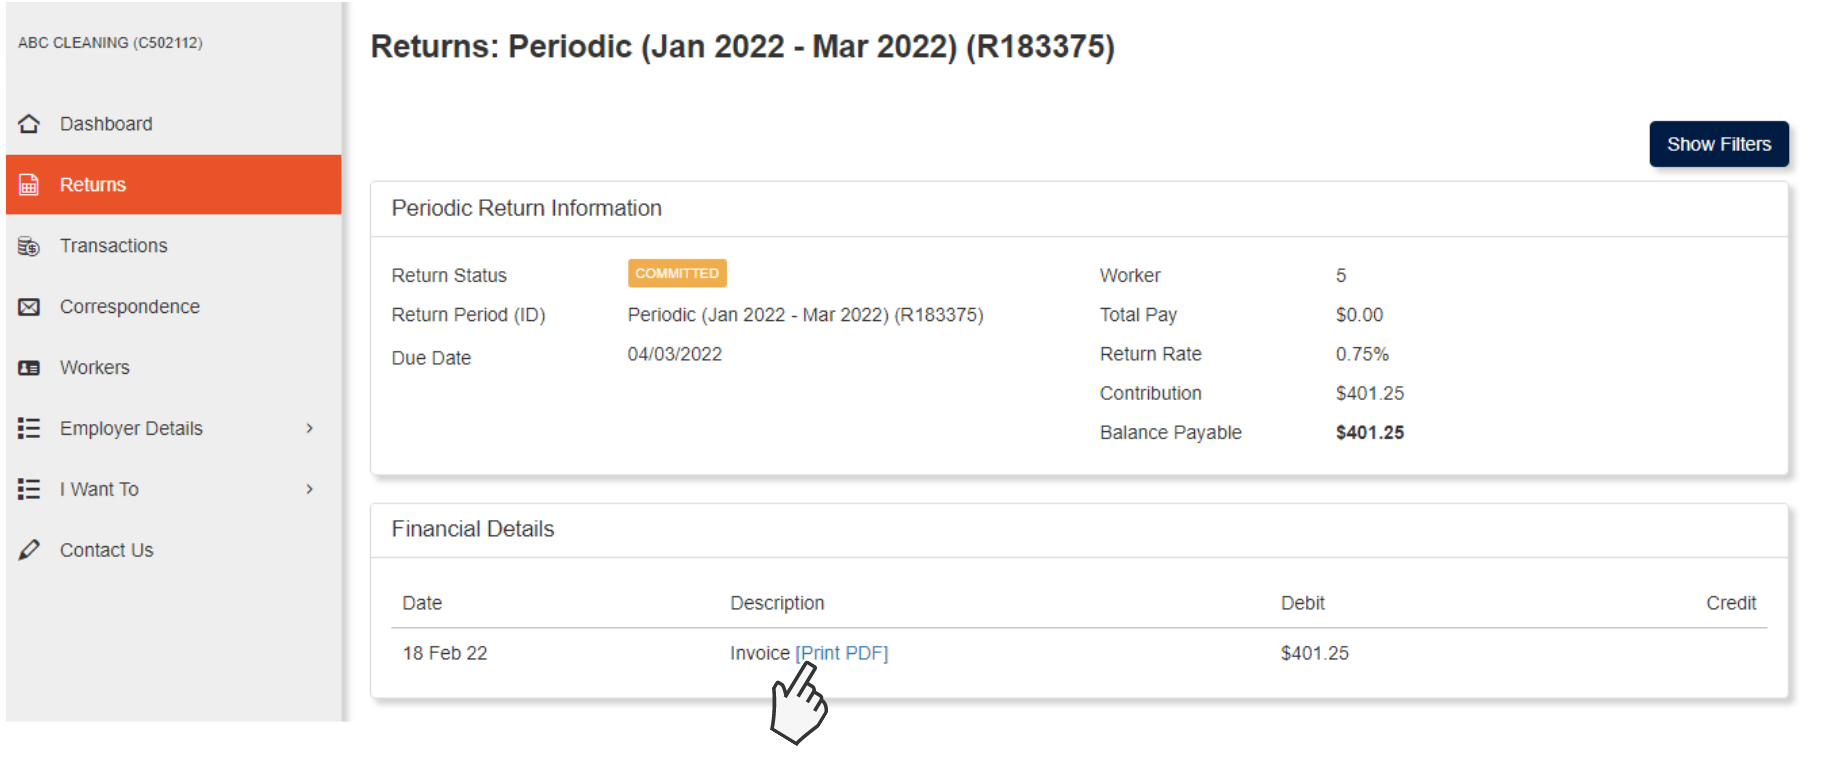
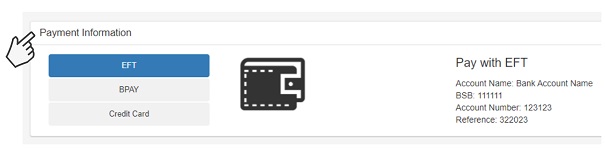
2. You can pay the levy by EFT, BPay or credit card using the payment details on the invoice or via the Payment Information section in the Returns tab.
Note: you may receive an error if you're paying your January to March 2022 levy via BPay. If this happens, please use the same reference number you used for the October to December 2021 return.
Note: it may take up to 14 days after we've received your payment for the payment status to be updated in the employer portal.
How to submit a Nil Return
If you didn’t engage any eligible workers during the quarter, you’ll need to submit a ‘NIL Return’ for the return period to QLeave.
1. Click the Returns tab on the left-hand menu.
2. Click the blue return number (e.g. R110080).
3. Click Submit Return on the top right of your screen.
4. A return submission alert will appear on your screen.
Click OK to submit a NIL Return
Your NIL return will now be sent to QLeave. We'll only contact you if we need more information, otherwise there's nothing else you need to do now until we email you to complete your next quarterly return.
Other helpful tips
Download a completed return
Once you have completed your employer return you can download a completed version of your return for your records.
1. Log in to the online portal.
2. From the left-hand side navigation select Returns.
3. Under Returns select the ID of the relevant return period.

4. Under Workers click the Export button to download a report containing all return information.
Download worker registration numbers
Once a worker is registered in your system you can download a report that will show all active workers and their membership numbers.
1. Log in to the online portal.
2. On the left hand side navigation choose Workers.
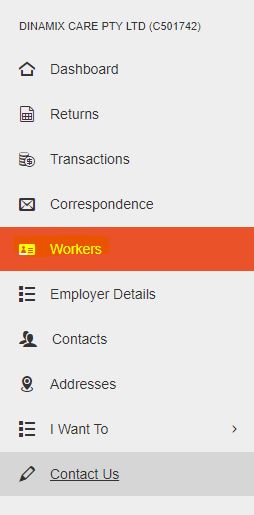
3. Under Active Workers select Export to Excel which will provide a report with a full list of membership numbers.

Adding new workers and changing details
- You can add new workers when you're completing your return.
- It's important that you provide the correct contact details and date of birth for each of your workers. This helps us to keep your workers updated and allows us to accurately identify a worker when they phone us. You're also required to provide this information to us under legislation.
- You only need to record service for workers who worked five or more days in the quarter. Any workers who worked less than five days do not need to be included on your return.
- The registration date is not the date of lodging the return, the start date of your business, or the current date.
- Please make sure you check the work classifications and work types of your existing workers while you're completing the return. You can change these details by clicking on the worker's name.
- You will need to contact us if you want to make changes to an existing worker's personal details.